比推 APP


零知识证明 – Halo2电路构建源代码导读
理解Halo2,可以从两部分着手:1/ 电路构建 2/ 证明系统。从开发者的角度看,电路构建是接口。如何通过Halo2构建建电路,这些电路在Halo2的内部如何表示是理解电路构建的关键。本文就从源代码的角度深入浅出讲解Halo2的电路构建。


在深入理解Halo2电路或者证明系统之前,请仔细查看Halo2的文档:
https://zcash.github.io/halo2/index.html
对应的中文翻译文档:
https://trapdoor-tech.github.io/halo2-book-chinese/
Halo2的源代码下载地址:
https://github.com/zcash/halo2.git
本文中采用的源代码的最后一个提交信息如下:
commit 658c2db4217b1b19b17ecd29577c0e370e1c4997
Merge: 3850b9c b46ef35
Author: str4d <[email protected]>
Date:   Sat Oct 2 01:54:55 2021 +1300

    Merge pull request #374 from zcash/trait-usage

    Clean up our trait usage
Halo2的目录结构如下:

主要逻辑在src目录下。benches是基准测试程序。book是Halo2的描述文档。examples目录下提供了简单电路示例。
在深入Halo2电路细节之前,先介绍一下Halo2的整体的电路结构。Halo2和PLONK/Groth16的电路结构有一些区别。简单的说,PLONK/Groth16约束系统由一条条相对独立的约束组成(约束只能约束该行上的变量),并且一条约束指定了支持的计算(乘法或者加法组合)。Halo2的约束系统中的约束并不限定在一行上的变量,并且采用“custom gate”,任意指定约束需要的计算。
整体电路结构如下:
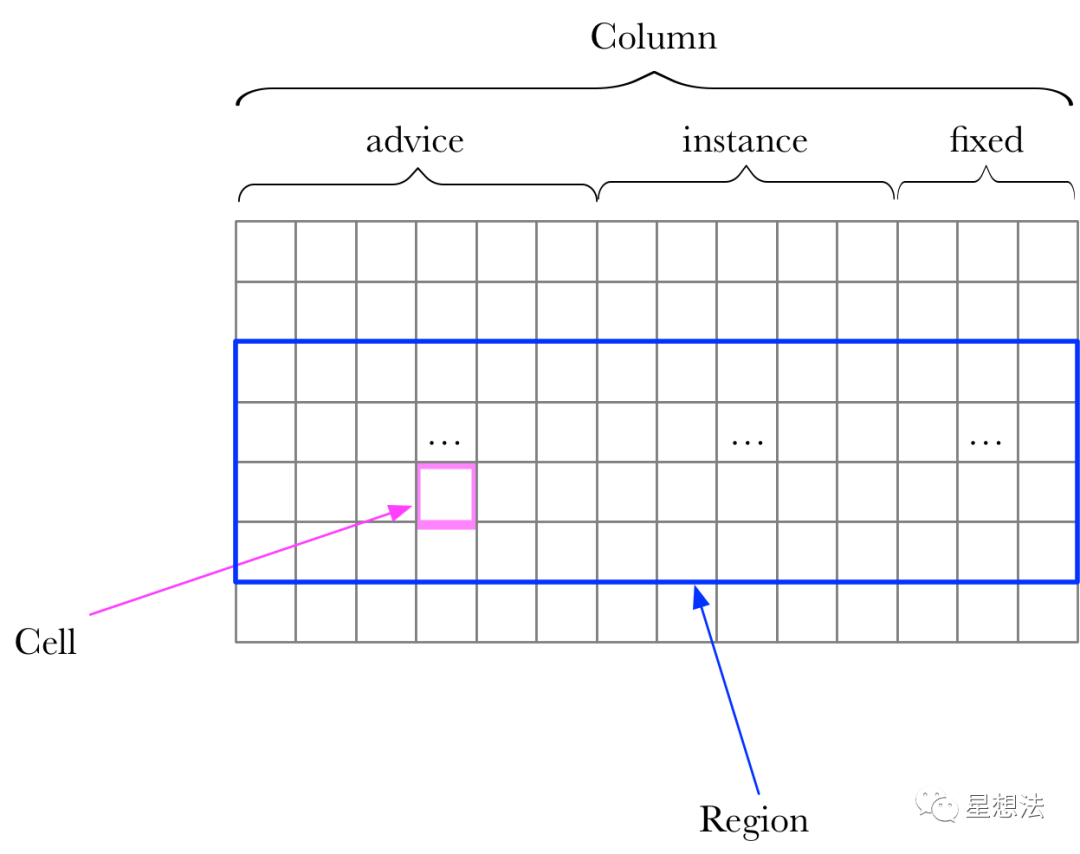
电路由列(Column)和行(Row)组成。列又分为三种类型:advice,instance和selector。列的类型定义在src/plonk/circuit.rs中。
pub enum Any {
    Advice,
    Fixed,
    Instance,
}
Advice列是witness信息,Instance列是public信息。Selector列,也是Fixed列,是选择子,可以选择某些约束开启或者关闭。为了更好的电路模块化,电路构建往往是相对于一个Region。同一个电路模块,可以在不同的Region中“复制”。
Cell定义在src/circuit.rs:
pub struct Cell {
    region_index: RegionIndex,
    row_offset: usize,
    column: Column<Any>,
}
Cell指定在一个Region中的某行某列。
理解Halo2的电路构建,可以从一个简单的例子开始:examples/simple-example.rs。理解这个例子前,需要介绍几个术语。
Chip
电路由一个个Chip逻辑堆砌而成。每个Chip的创建从“Config”开始。
Config
所谓的Config,就是申请Chip需要的Column以及配置Fixed列的逻辑含义。这些配置可能是Custom Gate,可能是lookup。
Instructions
每一个Chip都有指令(Instruction)。通过指令的调用,将Chip的部分或者全部功能加入电路中。
Layouter
将Chip添加到一个电路上需要布局。Layouter就是用来实现布局。Layouter接口定义在src/circuit.rs中:
pub trait Layouter<F: Field> {
    type Root: Layouter<F>;

    fn assign_region<A, AR, N, NR>(&mut self, name: N, assignment: A) -> Result<AR, Error>
    where
        A: FnMut(Region<'_, F>) -> Result<AR, Error>,
        N: Fn() -> NR,
        NR: Into<String>;

    fn assign_table<A, N, NR>(&mut self, name: N, assignment: A) -> Result<(), Error>
    where
        A: FnMut(Table<'_, F>) -> Result<(), Error>,
        N: Fn() -> NR,
        NR: Into<String>;

    fn constrain_instance(
        &mut self,
        cell: Cell,
        column: Column<Instance>,
        row: usize,
    ) -> Result<(), Error>;

    fn get_root(&mut self) -> &mut Self::Root;
    fn push_namespace<NR, N>(&mut self, name_fn: N)
    where
        NR: Into<String>,
        N: FnOnce() -> NR;
    fn pop_namespace(&mut self, gadget_name: Option<String>);
    fn namespace<NR, N>(&mut self, name_fn: N) -> NamespacedLayouter<'_, F, Self::Root>
    where
        NR: Into<String>,
        N: FnOnce() -> NR,
    {
        self.get_root().push_namespace(name_fn);

        NamespacedLayouter(self.get_root(), PhantomData)
    }
}
Layouter本身存在层级关系,所以Layouter的接口定义了get_root/push_namespace/pop_namespace/namespace相关的函数。核心逻辑在其他三个函数:
-
assign_region – 获取一个region,在这个region上可以进行各种“assignment”,定义在RegionLayouter接口中。
-
assign_table – 获取一个table,并设置table,接口定义在TableLayouter接口中。
-
constrain_instance – 限制一个Cell和Instance列中的某个Cell一致。
Assignment
Assignment是一个电路“赋值”的接口,定义在src/plonk/circuit.rs:
pub trait Assignment<F: Field> {
    fn enter_region<NR, N>(&mut self, name_fn: N)
    where
        NR: Into<String>,
        N: FnOnce() -> NR;

    fn exit_region(&mut self);

    fn enable_selector<A, AR>(
        &mut self,
        annotation: A,
        selector: &Selector,
        row: usize,
    ) -> Result<(), Error>
    where
        A: FnOnce() -> AR,
        AR: Into<String>;

    fn query_instance(&self, column: Column<Instance>, row: usize) -> Result<Option<F>, Error>;

    fn assign_advice<V, VR, A, AR>(
        &mut self,
        annotation: A,
        column: Column<Advice>,
        row: usize,
        to: V,
    ) -> Result<(), Error>
    where
        V: FnOnce() -> Result<VR, Error>,
        VR: Into<Assigned<F>>,
        A: FnOnce() -> AR,
        AR: Into<String>;

    fn assign_fixed<V, VR, A, AR>(
        &mut self,
        annotation: A,
        column: Column<Fixed>,
        row: usize,
        to: V,
    ) -> Result<(), Error>
    where
        V: FnOnce() -> Result<VR, Error>,
        VR: Into<Assigned<F>>,
        A: FnOnce() -> AR,
        AR: Into<String>;

    fn copy(
        &mut self,
        left_column: Column<Any>,
        left_row: usize,
        right_column: Column<Any>,
        right_row: usize,
    ) -> Result<(), Error>;

    fn fill_from_row(
        &mut self,
        column: Column<Fixed>,
        row: usize,
        to: Option<Assigned<F>>,
    ) -> Result<(), Error>;

    fn push_namespace<NR, N>(&mut self, name_fn: N)
    where
        NR: Into<String>,
        N: FnOnce() -> NR;

    fn pop_namespace(&mut self, gadget_name: Option<String>);
}

为了方便简化开发人员开发电路,Halo2的内部框架抽象了布局的接口(以SimpleFloorPlanner为例):
目前有两套Layouter的实现:1/ SimpleFloorPlanner 2/ V1/V1Plan。为了方便理解Halo2的内部逻辑,详细讲解一下SimpleFloorPlanner。整个框架由四个接口组成:FloorPlanner,Layouter,RegionLayout/TableLayout以及Assignment。
简单的说,一个FloorPlanner拥有一个Layouter,一个Layouter可以分配多个RegionLayout或者TableLayout。电路对Cell的assignment都是通过Assignment实现。
先从三者的整体调用关系讲起:
-
SimpleFloorPlanner是对FloorPlanner接口的实现,定义在src/circuit/floor_planner/single_pass.rs中:
pub struct SimpleFloorPlanner;

impl FloorPlanner for SimpleFloorPlanner {
    fn synthesize<F: Field, CS: Assignment<F>, C: Circuit<F>>(
        cs: &mut CS,
        circuit: &C,
        config: C::Config,
        constants: Vec<Column<Fixed>>,
    ) -> Result<(), Error> {
        let layouter = SingleChipLayouter::new(cs, constants)?;
        circuit.synthesize(config, layouter)
    }
}
SimpleFloorPlanner实现了FloorPlanner接口的synthesize函数。容易看出,该函数创建出SingleChipLayouter对象,并直接调用相应的synthesize函数开始电路的synthesize。
-
SingleChipLayouter定义在src/circuit/floor_planner/single_pass.rs中,包括了电路的所有的信息。
pub struct SingleChipLayouter<'a, F: Field, CS: Assignment<F> + 'a> {
    cs: &'a mut CS,
    constants: Vec<Column<Fixed>>,
    /// Stores the starting row for each region.
    regions: Vec<RegionStart>,
    /// Stores the first empty row for each column.
    columns: HashMap<RegionColumn, usize>,
    /// Stores the table fixed columns.
    table_columns: Vec<TableColumn>,
    _marker: PhantomData<F>,
}
SingleChipLayouter的Region管理比较简单,某行整体属于某个Region。regions记录每个Region的行的开始偏移。cs是Assignment接口的实现,存储所有电路的赋值信息。columns记录当前操作RegionColumn对应的空的row的偏移。table_columns记录Table需要的Fixed的Column。简单的说,SingleChipLayouter记录了电路(包括布局)需要的所有信息。
-
SingleChipLayouter's assign_region 函数实现一个Region的synthesize过程。简单的说,SingleChipLayouter的assign_region函数的主要逻辑就是创建一个region,并将region内的布局转化为全局布局。SingleChipLayouter的assign_region逻辑可以分成两部分:
1/ 通过RegionShape获取Region的“形状”。所谓的“形状”,包括主要是采用的Column的信息。
2/ 根据上一步获取的Column信息,找出和其他Region不冲突的起始问题。
可以查看代码中的注释理解相应逻辑:
fn assign_region<A, AR, N, NR>(&mut self, name: N, mut assignment: A) -> Result<AR, Error>
where
    A: FnMut(Region<'_, F>) -> Result<AR, Error>,
    N: Fn() -> NR,
    NR: Into<String>,
{
    let region_index = self.regions.len(); //获取当前Region的编号

    // Get shape of the region. //调用RegionShape的Region接口,收集该Region的电路涉及到的Column信息
    let mut shape = RegionShape::new(region_index.into());
    {
        let region: &mut dyn RegionLayouter<F> = &mut shape;
        assignment(region.into())?;
    }

    // Lay out this region. We implement the simplest approach here: position the
    // region starting at the earliest row for which none of the columns are in use.
    let mut region_start = 0; //根据收集到的Column信息,获取Region开始的行号
    for column in &shape.columns {
        region_start = cmp::max(region_start, self.columns.get(column).cloned().unwrap_or(0));
    }
    self.regions.push(region_start.into());

    // Update column usage information. //在Region中记录下所有使用的Column的信息
    for column in shape.columns {
        self.columns.insert(column, region_start + shape.row_count);
    }

    // Assign region cells.
    self.cs.enter_region(name); //创建Region
    let mut region = SingleChipLayouterRegion::new(self, region_index.into());
    let result = {
        let region: &mut dyn RegionLayouter<F> = &mut region;
        assignment(region.into()) //采用SingleChipLayouterRegion对电路赋值
    }?;
    let constants_to_assign = region.constants;
    self.cs.exit_region(); //退出Region

    // Assign constants. For the simple floor planner, we assign constants in order in
    // the first `constants` column.
    if self.constants.is_empty() {//如果制定了constants,需要增加置换限制
        if !constants_to_assign.is_empty() {
            return Err(Error::NotEnoughColumnsForConstants);
        }
    } else {
        let constants_column = self.constants[0];
        let next_constant_row = self
            .columns
            .entry(Column::<Any>::from(constants_column).into())
            .or_default();
        for (constant, advice) in constants_to_assign {
            self.cs.assign_fixed(
                || format!("Constant({:?})", constant.evaluate()),
                constants_column,
                *next_constant_row,
                || Ok(constant),
            )?;
            self.cs.copy(
                constants_column.into(),
                *next_constant_row,
                advice.column,
                *self.regions[*advice.region_index] + advice.row_offset,
            )?;
            *next_constant_row += 1;
        }
    }

    Ok(result)
} -
SingleChipLayouter's assign_table 函数当前的电路中增加查找表逻辑:
fn assign_table<A, N, NR>(&mut self, name: N, mut assignment: A) -> Result<(), Error>
where
    A: FnMut(Table<'_, F>) -> Result<(), Error>,
    N: Fn() -> NR,
    NR: Into<String>,
{
    // Maintenance hazard: there is near-duplicate code in `v1::AssignmentPass::assign_table`.
    // Assign table cells.
    self.cs.enter_region(name); //创建一个Region
    let mut table = SimpleTableLayouter::new(self.cs, &self.table_columns);
    {
        let table: &mut dyn TableLayouter<F> = &mut table;
        assignment(table.into()) //查找表赋值
    }?;
    let default_and_assigned = table.default_and_assigned;
    self.cs.exit_region(); //退出当前Region

    // Check that all table columns have the same length `first_unused`,
    // and all cells up to that length are assigned.
    let first_unused = { //获取出所有查找表相关的Column对应的最大使用行数
        match default_and_assigned
            .values()
            .map(|(_, assigned)| {
                if assigned.iter().all(|b| *b) {
                    Some(assigned.len())
                } else {
                    None
                }
            })
            .reduce(|acc, item| match (acc, item) {
                (Some(a), Some(b)) if a == b => Some(a),
                _ => None,
            }) {
            Some(Some(len)) => len,
            _ => return Err(Error::SynthesisError), // TODO better error
        }
    };

    // Record these columns so that we can prevent them from being used again.
    for column in default_and_assigned.keys() {
        self.table_columns.push(*column);
    }
    //根据default_and_assigned信息,采用default值扩展所有的column
    for (col, (default_val, _)) in default_and_assigned {
        // default_val must be Some because we must have assigned
        // at least one cell in each column, and in that case we checked
        // that all cells up to first_unused were assigned.
        self.cs
            .fill_from_row(col.inner(), first_unused, default_val.unwrap())?;
    }

    Ok(())
}
default_and_assigned记录了在一个Fixed Column上的default值以及某个cell是否已经设置。
-
SingleChipLayouterRegion实现了Region接口。如果在Region中需要给一个Advice列中Cell赋值,可以采用assign_advice函数:
fn assign_advice<'v>(
    &'v mut self,
    annotation: &'v (dyn Fn() -> String + 'v),
    column: Column<Advice>,
    offset: usize,
    to: &'v mut (dyn FnMut() -> Result<Assigned<F>, Error> + 'v),
) -> Result<Cell, Error> {
    self.layouter.cs.assign_advice( //调用Assignment接口设置相应的Cell信息,特别注意的是在设置的时候需要Cell的全局偏移
        annotation,
        column,
        *self.layouter.regions[*self.region_index] + offset,
        to,
    )?;

    Ok(Cell {
        region_index: self.region_index,
        row_offset: offset,
        column: column.into(),
    })
} -
cs.assign_fixed函数,对fixed Column进行赋值。可以参考MockProver的实现,定义在src/dev.rs。
fn assign_fixed<V, VR, A, AR>(
    &mut self,
    _: A,
    column: Column<Fixed>,
    row: usize,
    to: V,
) -> Result<(), Error>
where
    V: FnOnce() -> Result<VR, Error>,
    VR: Into<Assigned<F>>,
    A: FnOnce() -> AR,
    AR: Into<String>,
{
    ... //在一些检查后,设置Fixed列中的某个Cell(column,row指定)
    *self
        .fixed
        .get_mut(column.index())
        .and_then(|v| v.get_mut(row))
        .ok_or(Error::BoundsFailure)? = CellValue::Assigned(to()?.into().evaluate());

    Ok(())
} -
cs.copy函数,增加置换信息。
fn copy(
    &mut self,
    left_column: Column<Any>,
    left_row: usize,
    right_column: Column<Any>,
    right_row: usize,
) -> Result<(), crate::plonk::Error> {
    if !self.usable_rows.contains(&left_row) || !self.usable_rows.contains(&right_row) {
        return Err(Error::BoundsFailure);
    }

    self.permutation //增加Permutation信息
        .copy(left_column, left_row, right_column, right_row)
}
接着我们再详细看看RegionLayouter和TableLayouter。RegionLayouter定义在src/circuit/layouter.rs:
pub trait RegionLayouter<F: Field>: fmt::Debug {
    //enable选择子
    fn enable_selector<'v>(
        &'v mut self,
        annotation: &'v (dyn Fn() -> String + 'v),
        selector: &Selector,
        offset: usize,
    ) -> Result<(), Error>;

    //advice或者fixed赋值
    fn assign_advice<'v>(
        &'v mut self,
        annotation: &'v (dyn Fn() -> String + 'v),
        column: Column<Advice>,
        offset: usize,
        to: &'v mut (dyn FnMut() -> Result<Assigned<F>, Error> + 'v),
    ) -> Result<Cell, Error>;

    fn assign_advice_from_constant<'v>(
        &'v mut self,
        annotation: &'v (dyn Fn() -> String + 'v),
        column: Column<Advice>,
        offset: usize,
        constant: Assigned<F>,
    ) -> Result<Cell, Error>;

    fn assign_advice_from_instance<'v>(
        &mut self,
        annotation: &'v (dyn Fn() -> String + 'v),
        instance: Column<Instance>,
        row: usize,
        advice: Column<Advice>,
        offset: usize,
    ) -> Result<(Cell, Option<F>), Error>;

    fn assign_fixed<'v>(
        &'v mut self,
        annotation: &'v (dyn Fn() -> String + 'v),
        column: Column<Fixed>,
        offset: usize,
        to: &'v mut (dyn FnMut() -> Result<Assigned<F>, Error> + 'v),
    ) -> Result<Cell, Error>;

    //cell相等约束
    fn constrain_constant(&mut self, cell: Cell, constant: Assigned<F>) -> Result<(), Error>;

    fn constrain_equal(&mut self, left: Cell, right: Cell) -> Result<(), Error>;
}
RegionLayouter的接口很容易理解,包括设置选择子,给cell赋值,约束cell相等。
TableLayouter的接口定义如下:
pub trait TableLayouter<F: Field>: fmt::Debug {
    fn assign_cell<'v>(
        &'v mut self,
        annotation: &'v (dyn Fn() -> String + 'v),
        column: TableColumn,
        offset: usize,
        to: &'v mut (dyn FnMut() -> Result<Assigned<F>, Error> + 'v),
    ) -> Result<(), Error>;
}
TableLayouter只有一个接口:assign_cell。assign_cell是对表中的某个TableColumn的Cell进行赋值。
至此,大体的电路构造的逻辑的框架相对清楚:Halo2中的Chip电路由一个个Region组成,在Halo2的框架中,Region通过Layouter进行分配。电路的所有的信息都存储在Assignment的接口中。MockProver是一个可以参考的Assignment的实现。
ConstraintSystem描述了电路相关的信息:
#[derive(Debug, Clone)]
pub struct ConstraintSystem<F: Field> {
    pub(crate) num_fixed_columns: usize,
    pub(crate) num_advice_columns: usize,
    pub(crate) num_instance_columns: usize,
    pub(crate) num_selectors: usize,
    pub(crate) selector_map: Vec<Column<Fixed>>,
    pub(crate) gates: Vec<Gate<F>>,
    pub(crate) advice_queries: Vec<(Column<Advice>, Rotation)>,
    // Contains an integer for each advice column
    // identifying how many distinct queries it has
    // so far; should be same length as num_advice_columns.
    num_advice_queries: Vec<usize>,
    pub(crate) instance_queries: Vec<(Column<Instance>, Rotation)>,
    pub(crate) fixed_queries: Vec<(Column<Fixed>, Rotation)>,

    // Permutation argument for performing equality constraints
    pub(crate) permutation: permutation::Argument,

    // Vector of lookup arguments, where each corresponds to a sequence of
    // input expressions and a sequence of table expressions involved in the lookup.
    pub(crate) lookups: Vec<lookup::Argument<F>>,

    // Vector of fixed columns, which can be used to store constant values
    // that are copied into advice columns.
    pub(crate) constants: Vec<Column<Fixed>>,

    pub(crate) minimum_degree: Option<usize>,
}
大部分字段都比较好理解。gates描述了“Custom Gate”的限制表达式:
#[derive(Clone, Debug)]
pub(crate) struct Gate<F: Field> {
    name: &'static str,
    constraint_names: Vec<&'static str>,
    polys: Vec<Expression<F>>,
    /// We track queried selectors separately from other cells, so that we can use them to
    /// trigger debug checks on gates.
    queried_selectors: Vec<Selector>,
    queried_cells: Vec<VirtualCell>,
}
注意polys中的表达式Expression就是用来表示“Custom Gate”。Halo2的电路构建分为两部分:1/Configure (电路配置)2/ Synthesize(电路综合)。简单的说,Configure就是进行电路本身的配置。Synthesize进行某个电路实例的综合。
理解了如上的逻辑,来看看Halo2代码提供的简单的示例程序:examples/simple-example.rs
-
Configure过程
Configure调用ConstraintSystem申请各种列以及Gate的信息。调用某个Circuit的Configure函数会顺序调用电路涉及到的Chip的Configure信息,这些信息都记录在ConstraintSystem中。
查看实例中的Chip的Configure函数:
impl<F: FieldExt> Circuit<F> for MyCircuit<F> {
    ...
    fn configure(meta: &mut ConstraintSystem<F>) -> Self::Config {
        let advice = [meta.advice_column(), meta.advice_column()];
        let instance = meta.instance_column();
        let constant = meta.fixed_column();

        FieldChip::configure(meta, advice, instance, constant)
    }
    ...
}

impl<F: FieldExt> FieldChip<F> {
    fn construct(config: <Self as Chip<F>>::Config) -> Self {
        Self {
            config,
            _marker: PhantomData,
        }
    }

    fn configure(
        meta: &mut ConstraintSystem<F>,
        advice: [Column<Advice>; 2],
        instance: Column<Instance>,
        constant: Column<Fixed>,
    ) -> <Self as Chip<F>>::Config {
        meta.enable_equality(instance.into());
        meta.enable_constant(constant);
        for column in &advice {
            meta.enable_equality((*column).into());
        }
        let s_mul = meta.selector();

        meta.create_gate("mul", |meta| {
            // | a0  | a1  | s_mul |
            // |-----|-----|-------|
            // | lhs | rhs | s_mul |
            // | out |     |       |
            let lhs = meta.query_advice(advice[0], Rotation::cur());
            let rhs = meta.query_advice(advice[1], Rotation::cur());
            let out = meta.query_advice(advice[0], Rotation::next());
            let s_mul = meta.query_selector(s_mul);

            vec![s_mul * (lhs * rhs - out)]
        });

        FieldConfig {
            advice,
            instance,
            s_mul,
            constant,
        }
    }
}
示例电路申请了两个advice列,一个instance和fixed列。同时电路构造了一个乘法Gate:
vec![s_mul * (lhs * rhs - out)]
该乘法Gate就是相应的限制表达式。注意和其他零知识证明的约束系统不一样的是,一个约束可以采用多个行上的Cell。整个调用关系如下:
-
Synthesize过程
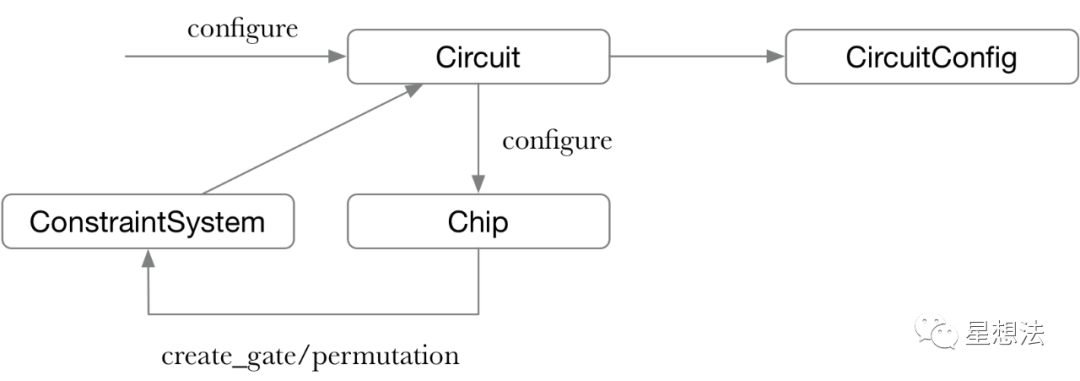
在Configure完电路后,可以调用synthesize综合某个电路实例。整个调用关系如下:

某个Chip调用Layouter分配Region,并在Region中指定约束。可以查看FieldChip的mul函数:
impl<F: FieldExt> NumericInstructions<F> for FieldChip<F> {
    fn mul(
        &self,
        mut layouter: impl Layouter<F>,
        a: Self::Num,
        b: Self::Num,
    ) -> Result<Self::Num, Error> {
        let config = self.config();

        let mut out = None;
        layouter.assign_region(
            || "mul",
            |mut region: Region<'_, F>| {
                config.s_mul.enable(&mut region, 0)?; //获取到一个Region后,enable该row对应的乘法selector。

                let lhs = region.assign_advice( //对两个advice进行赋值
                    || "lhs",
                    config.advice[0],
                    0,
                    || a.value.ok_or(Error::SynthesisError),
                )?;
                let rhs = region.assign_advice(
                    || "rhs",
                    config.advice[1],
                    0,
                    || b.value.ok_or(Error::SynthesisError),
                )?;
                region.constrain_equal(a.cell, lhs)?; //限制两个advice和之前的load的Cell一致
                region.constrain_equal(b.cell, rhs)?;

                // Now we can assign the multiplication result into the output position.
                let value = a.value.and_then(|a| b.value.map(|b| a * b));
                let cell = region.assign_advice( //对乘法的输出进行赋值
                    || "lhs * rhs",
                    config.advice[0],
                    1,
                    || value.ok_or(Error::SynthesisError),
                )?;

                // Finally, we return a variable representing the output,
                // to be used in another part of the circuit.
                out = Some(Number { cell, value });
                Ok(())
            },
        )?;

        Ok(out.unwrap())
    }
    ...
}
总结:
理解Halo2,可以从两部分着手:1/ 电路构建 2/ 证明系统。从开发者的角度看,电路构建是接口。如何通过Halo2创建电路,这些电路在Halo2的内部如何表示是理解电路构建的关键。Halo2中的Chip电路由一个个Region组成,在Halo2的框架中,Region通过Layouter进行分配。电路的所有的信息都存储在Assignment的接口中。Halo2的电路构建分为两部分:1/Configure (电路配置)2/ Synthesize(电路综合)。简单的说,Configure就是进行电路本身的配置。Synthesize进行某个电路实例的综合。

比推快讯
更多 >>- 伊拉克武装组织称打击美军基地
- 马斯克转发旧帖回复与哈梅内伊关联言论
- 某鲸鱼在官方公布哈梅内伊遇害后 40 倍做多比特币,爆仓价 66,559 美元
- 伊朗公布部分遇害高级军官名单
- AI Agent 发射台 Clawnch 与 Bankr 达成合作,Bankr 将成为其代币发行底层启动器
- 币安向阿联酋员工发布安全提示
- 伊朗确认其武装部队总参谋长穆萨维身亡
- 斩首细节披露:哈梅内伊住所被投掷约 30 枚炸弹
- 迪拜港口遭伊朗袭击波及,燃起熊熊大火
- CNN:伊朗关键人物拉里贾尼誓言要刺穿美国的心脏
- Binance 内部通知:要求阿联酋全体员工留在室内,避免外出
- 伊议长:已为哈梅内伊殉难后的阶段制定预案
- 马斯克:X 平台使用量创历史新高
- 下周宏观展望:非农、失业率数据来袭,中东战火引发避险情绪升温
- 特朗普:若伊朗发动袭击,美国将以前所未有的力量回击
- 美以袭击伊朗引爆预测市场,Polymarket 相关事件合约“吸金”6 亿美元
- 美媒披露哈梅内伊住所遭袭的前后对比卫星图
- 马斯克:X 平台新增时间线主题选择功能
- 伊朗革命卫队称导弹击中以军总参谋部
- Polymarket 出现多份伊朗相关合约,哈梅内伊下台合约吸引 4500 万美元交易量
- 以军称完成对伊朗新一轮空袭,袭击约 30 个目标
- 伊朗向以色列发射新一波导弹,此前曾对伊拉克北部美军基地发起袭击
- 彭博社:伊朗最高领袖身亡后,比特币反弹至 6.8 万美元上方
- 经历美伊冲突洗礼,当前市场看空情绪获得缓解
- 分析师:周一避险资产可能跳空高开
- 数据:ETH 全网合约持仓量 24h 增长 5.01%
- 数据:以太坊现货 ETF 本周净流入 8046 万美元,灰度 ETHE 净流入 4046.88 万美元居首
- 数据:COS 24 小时跌超 19%,CELO 涨超 14%
- Kalshi CEO:反对利用个体死亡牟利,将退还“哈梅内伊是否卸任”相关市场的费用
- Aave 治理争议,期间 Aave TVL 从 360 亿美元降至 265 亿美元
- RootData:STABLE 将于一周后解锁价值约 2997 万美元的代币
- 特朗普:通过外交途径解决伊朗问题仍然可行,而且“现在容易得多”
- 伊朗革命卫队:对以美基地“最猛烈”进攻即将开始
- 美官员称美以在哈梅内伊与其高级助手举行会议时发动袭击;纽约爆发抗议集会
- 数据:Hyperliquid 平台鲸鱼当前持仓 30.62 亿美元,多空持仓比为 0.98
- 某巨鲸链上做空黄金和白银浮亏超 230 万美元
- 美议员:对伊朗动武是没有紧迫威胁下的非法战争
- 过去 1 小时全网爆仓 4156.49 万美元,主爆空单
- 数据:ETH 突破 2000 美元
- 比特币回升突破 6.7 万美元,以太坊回升突破 2000 美元
- ETH 突破 2000 USDT,24H 涨幅 3.76%
- 沉睡两年的某巨鲸 6 小时内买入 4819 枚 ETH
- 美媒:沙特和以色列的施压促使特朗普下令攻击伊朗
- 观点:加密财库公司或于 2026 年迎来整合潮,运营型企业具并购优势
- 美联社:美国国会议员拟推动战争权力决议限制对伊行动
- 特朗普称已知伊朗潜在领导人选,国会酝酿战争权力投票限制对伊军事行动
- 美国在中东袭击中使用 Anthropic 技术
- 迪拜帆船酒店遭到袭击着火
- 比特币 2026 年 2 月回报率为-14.94%,创 2013 年以来第三低月度回报率纪录
- Sam Altman 回应美国战争部选择 OpenAI 而非 Anthropic:或因运营控制权诉求存在分歧
比推专栏
更多 >>- Big player's 『Trigger moment』|0227Europe
- 简街有没有「操纵」BTC?拆解 AP 制度,读懂 ETF 申赎机制背后的定价权博弈
- Happy new year【Horse success】|0213Asian
- Was it finished?|0206 Asian
- 围猎以太坊多头:「巨鲸」们暴亏 70 亿美元,正被集体围观
- Challenge,risk And chances|0130 Asian
- Meta 豪赌 AI:砸钱 1350 亿美元,2026 的扎克伯格,值得相信么?
- Variables: Terrible snowstorm|0128 Asian
- 英特尔「生死线」时刻:在 ICU 门前,陈立武如何清算遗产并开启自救?
- 從1月13號到今天,提前到5100|0126Asian